Potato Skin Bites

Now that we know who will be facing off in the Super Bowl, we can turn our attention to more important game day matters- The Menu!

Let’s be real, Super Bowl Sunday is as much about game day eats as it is about the touchdowns and tackles on the field.

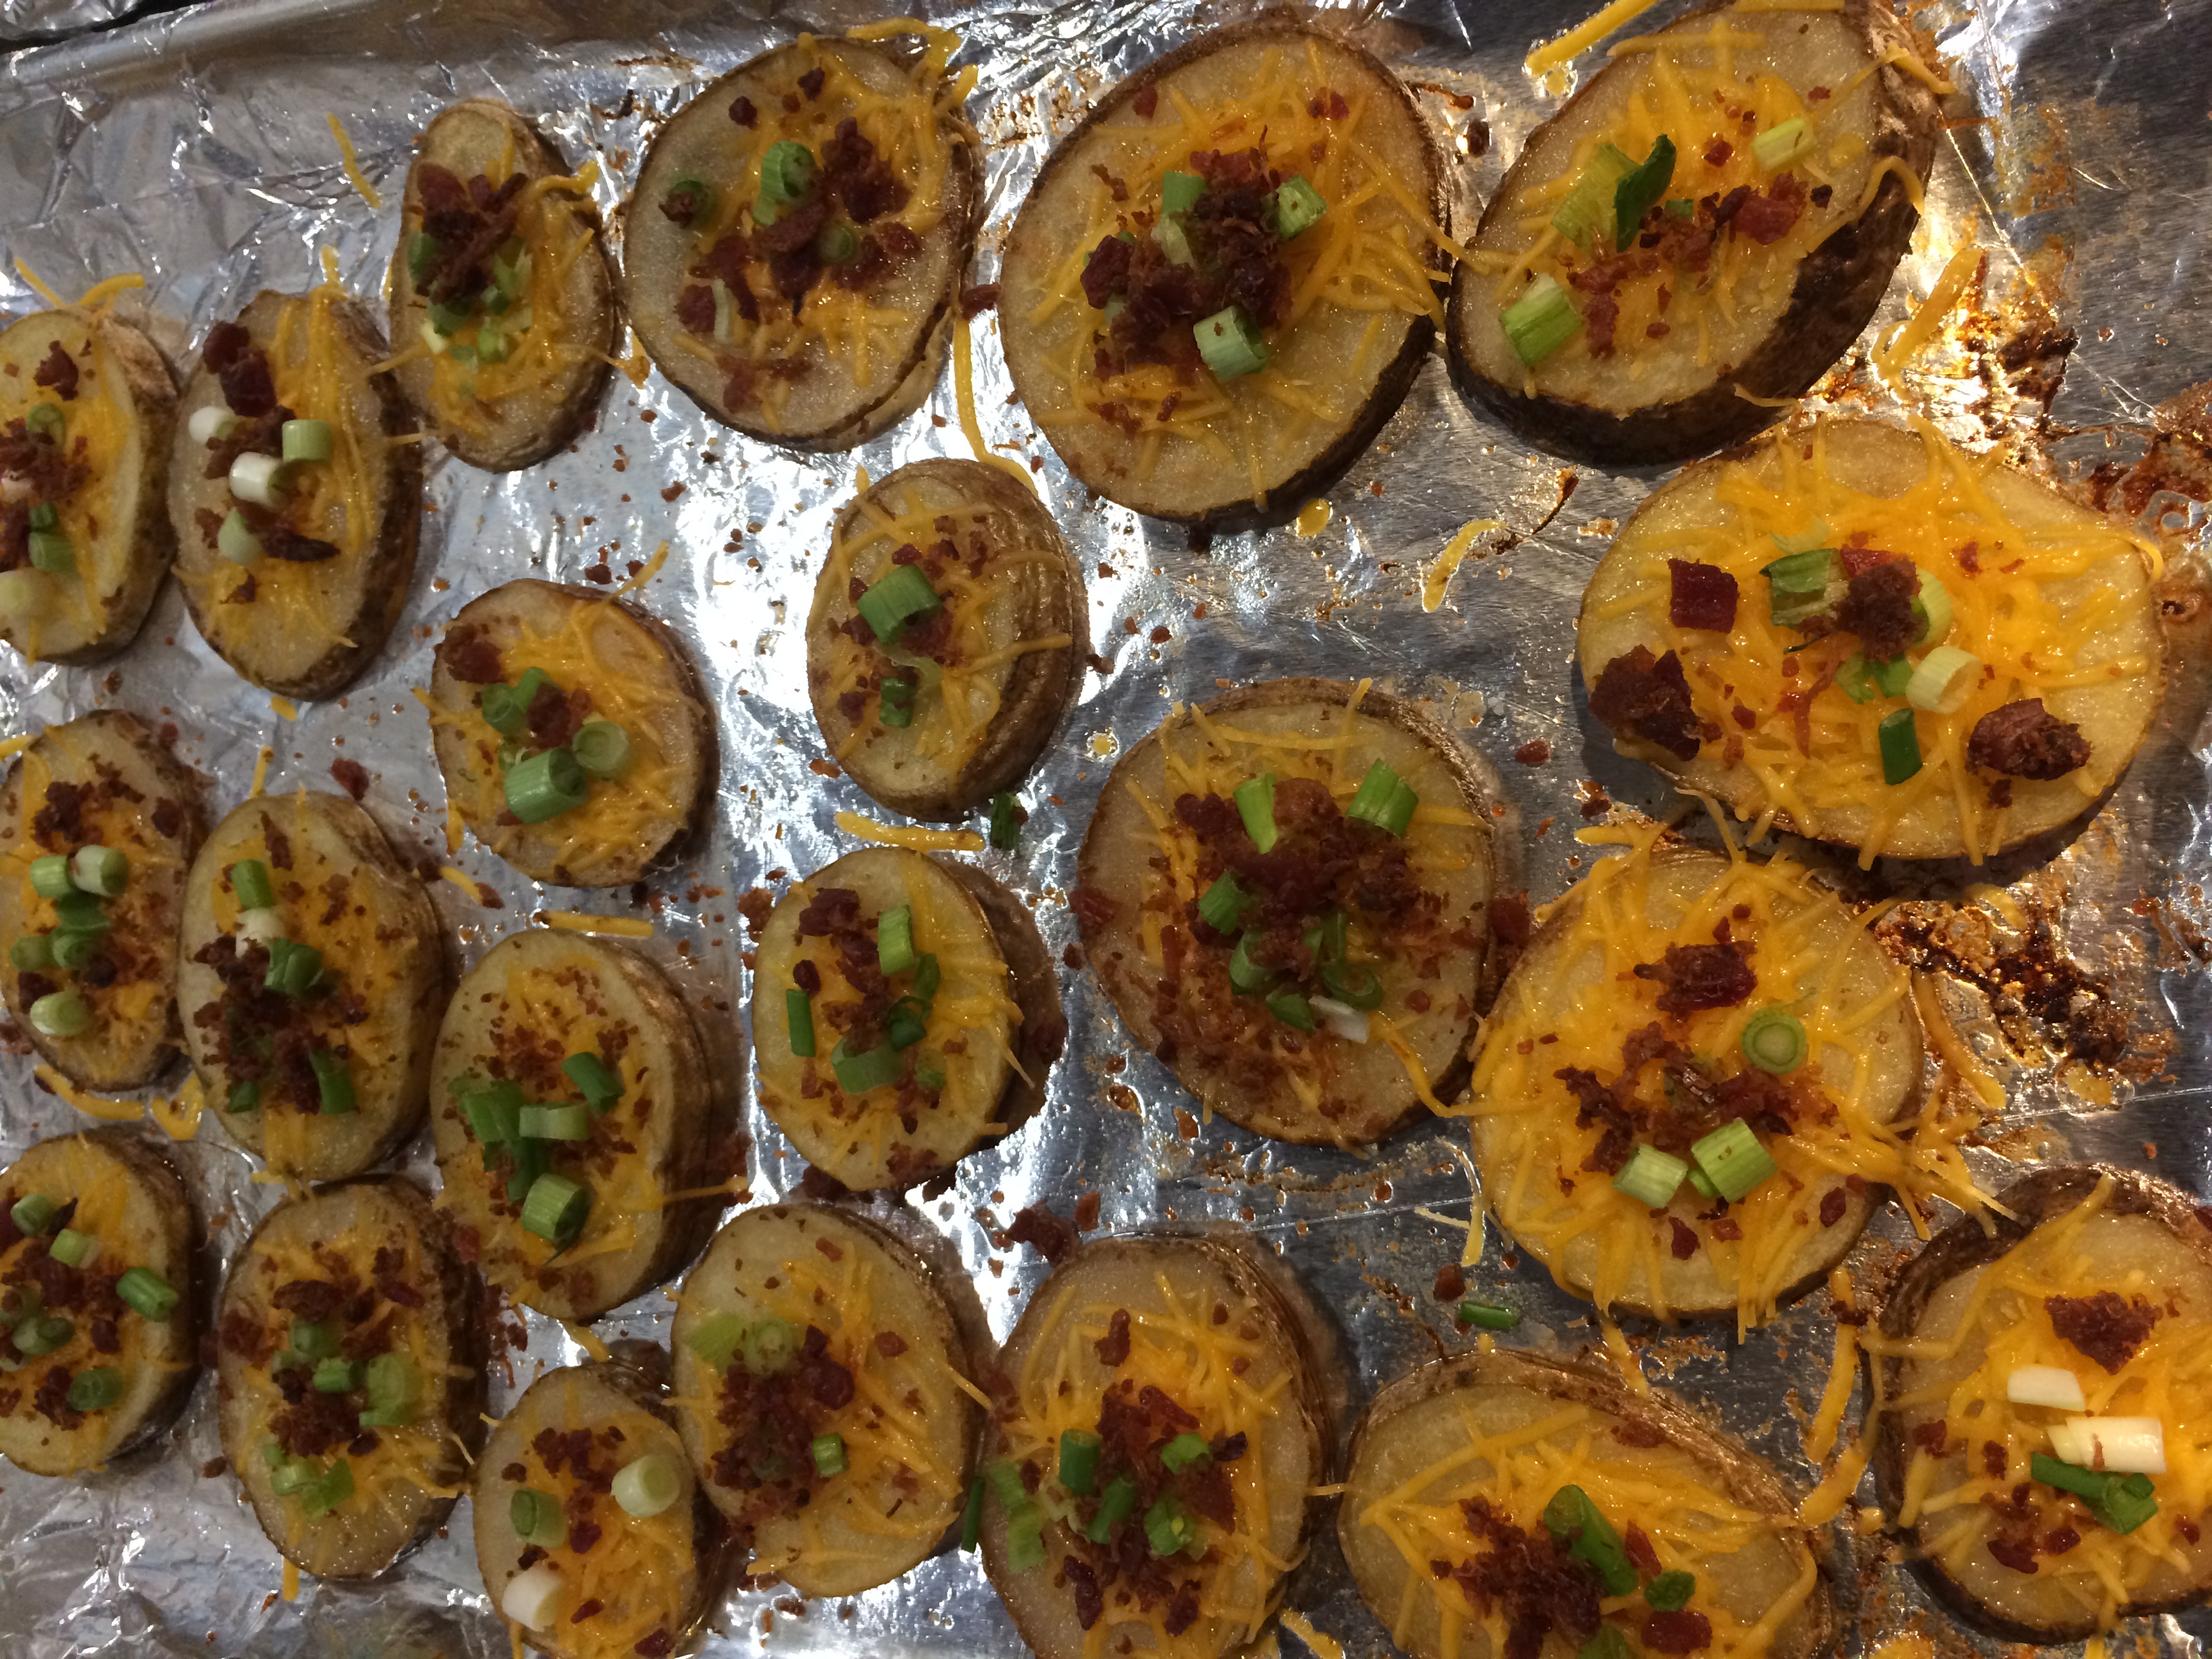
A friend of ours made this incredible little potato skin bites at a party over the summer, and I knew that they would be perfect with a big pot of chili for game day.

Typically, potato skins are kind of a pain to make and to eat. You bake the potato. You hollow out the potato. You fill the potato. You bake the potato again. Then you go to pop one and they really aren’t a poppable snack. They’re a two-three biter, and may even require a knife and fork. That’s why these little guys are perfect for the game. They’re as poppable as potato chips but a million times better.

Super easy to make too!

You will need

  • 4-5 baking potatoes (I made two cookie sheets worth of potato skin bites from this)
  • 1 stick of butter, melted
  • shredded cheddar cheese (or monterey jack)
  • scallion, sliced thinly
  • bacon bits

Preheat oven to 400.

Cover baking sheets in foil.

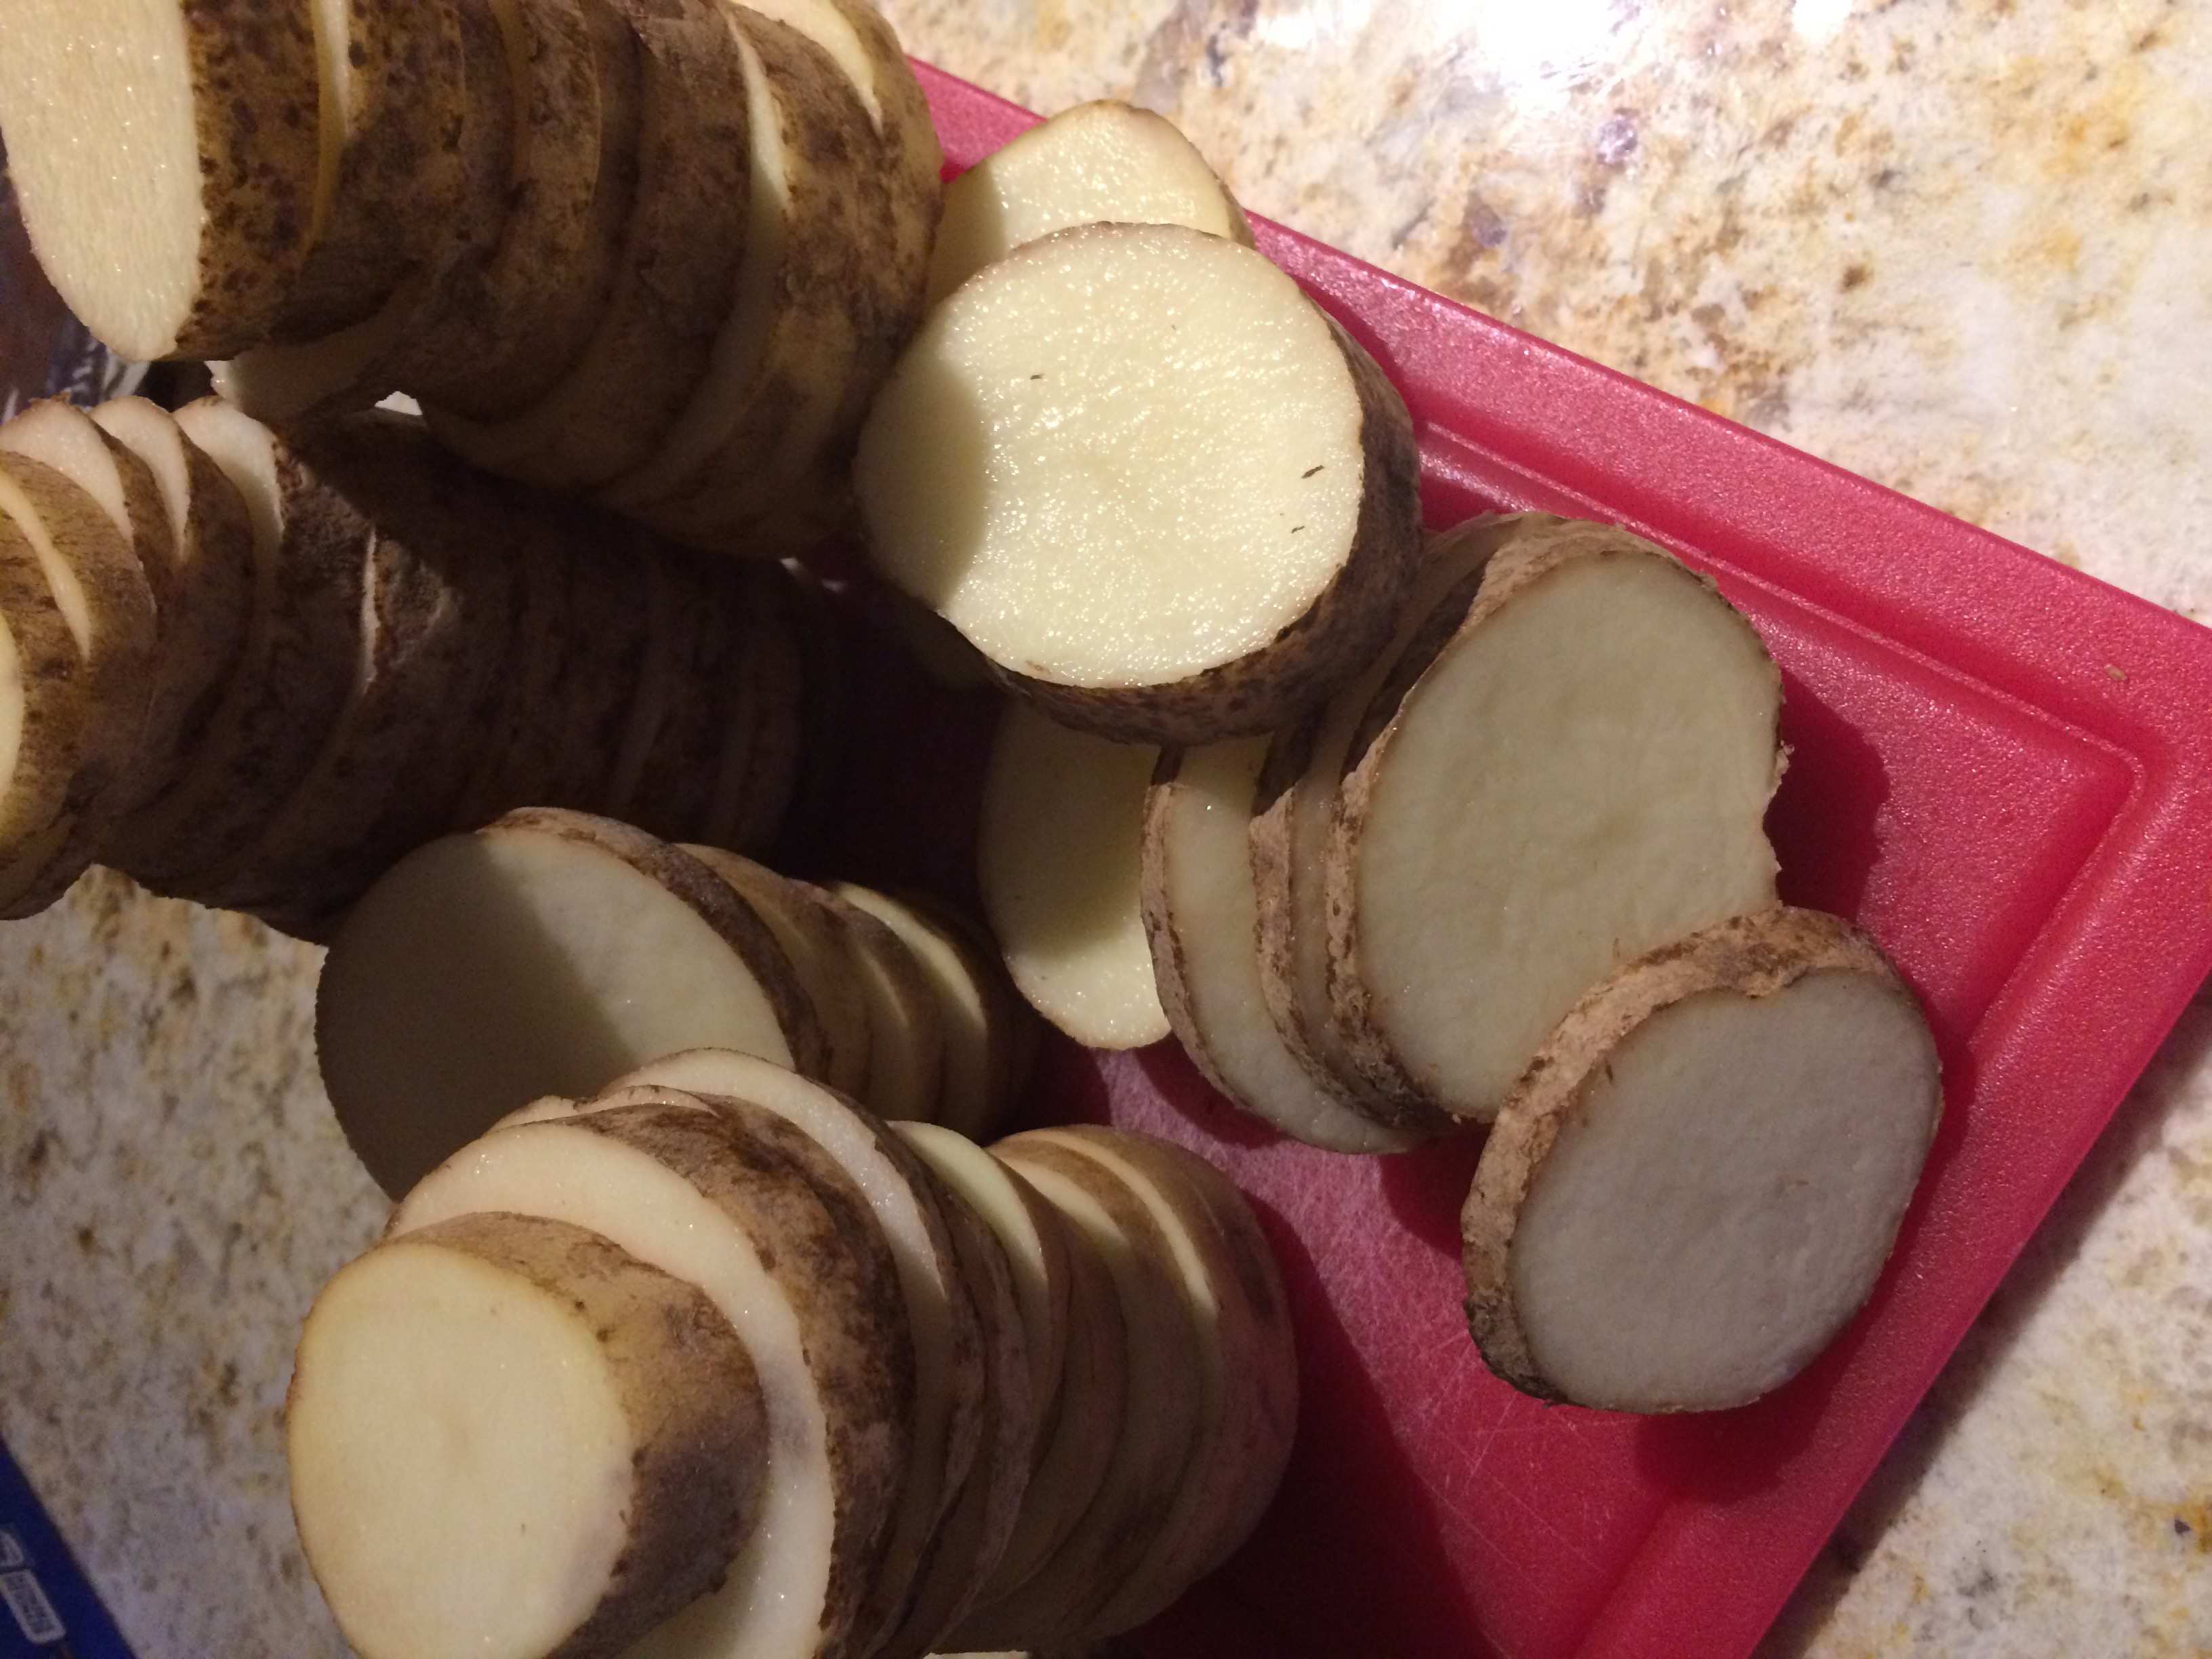
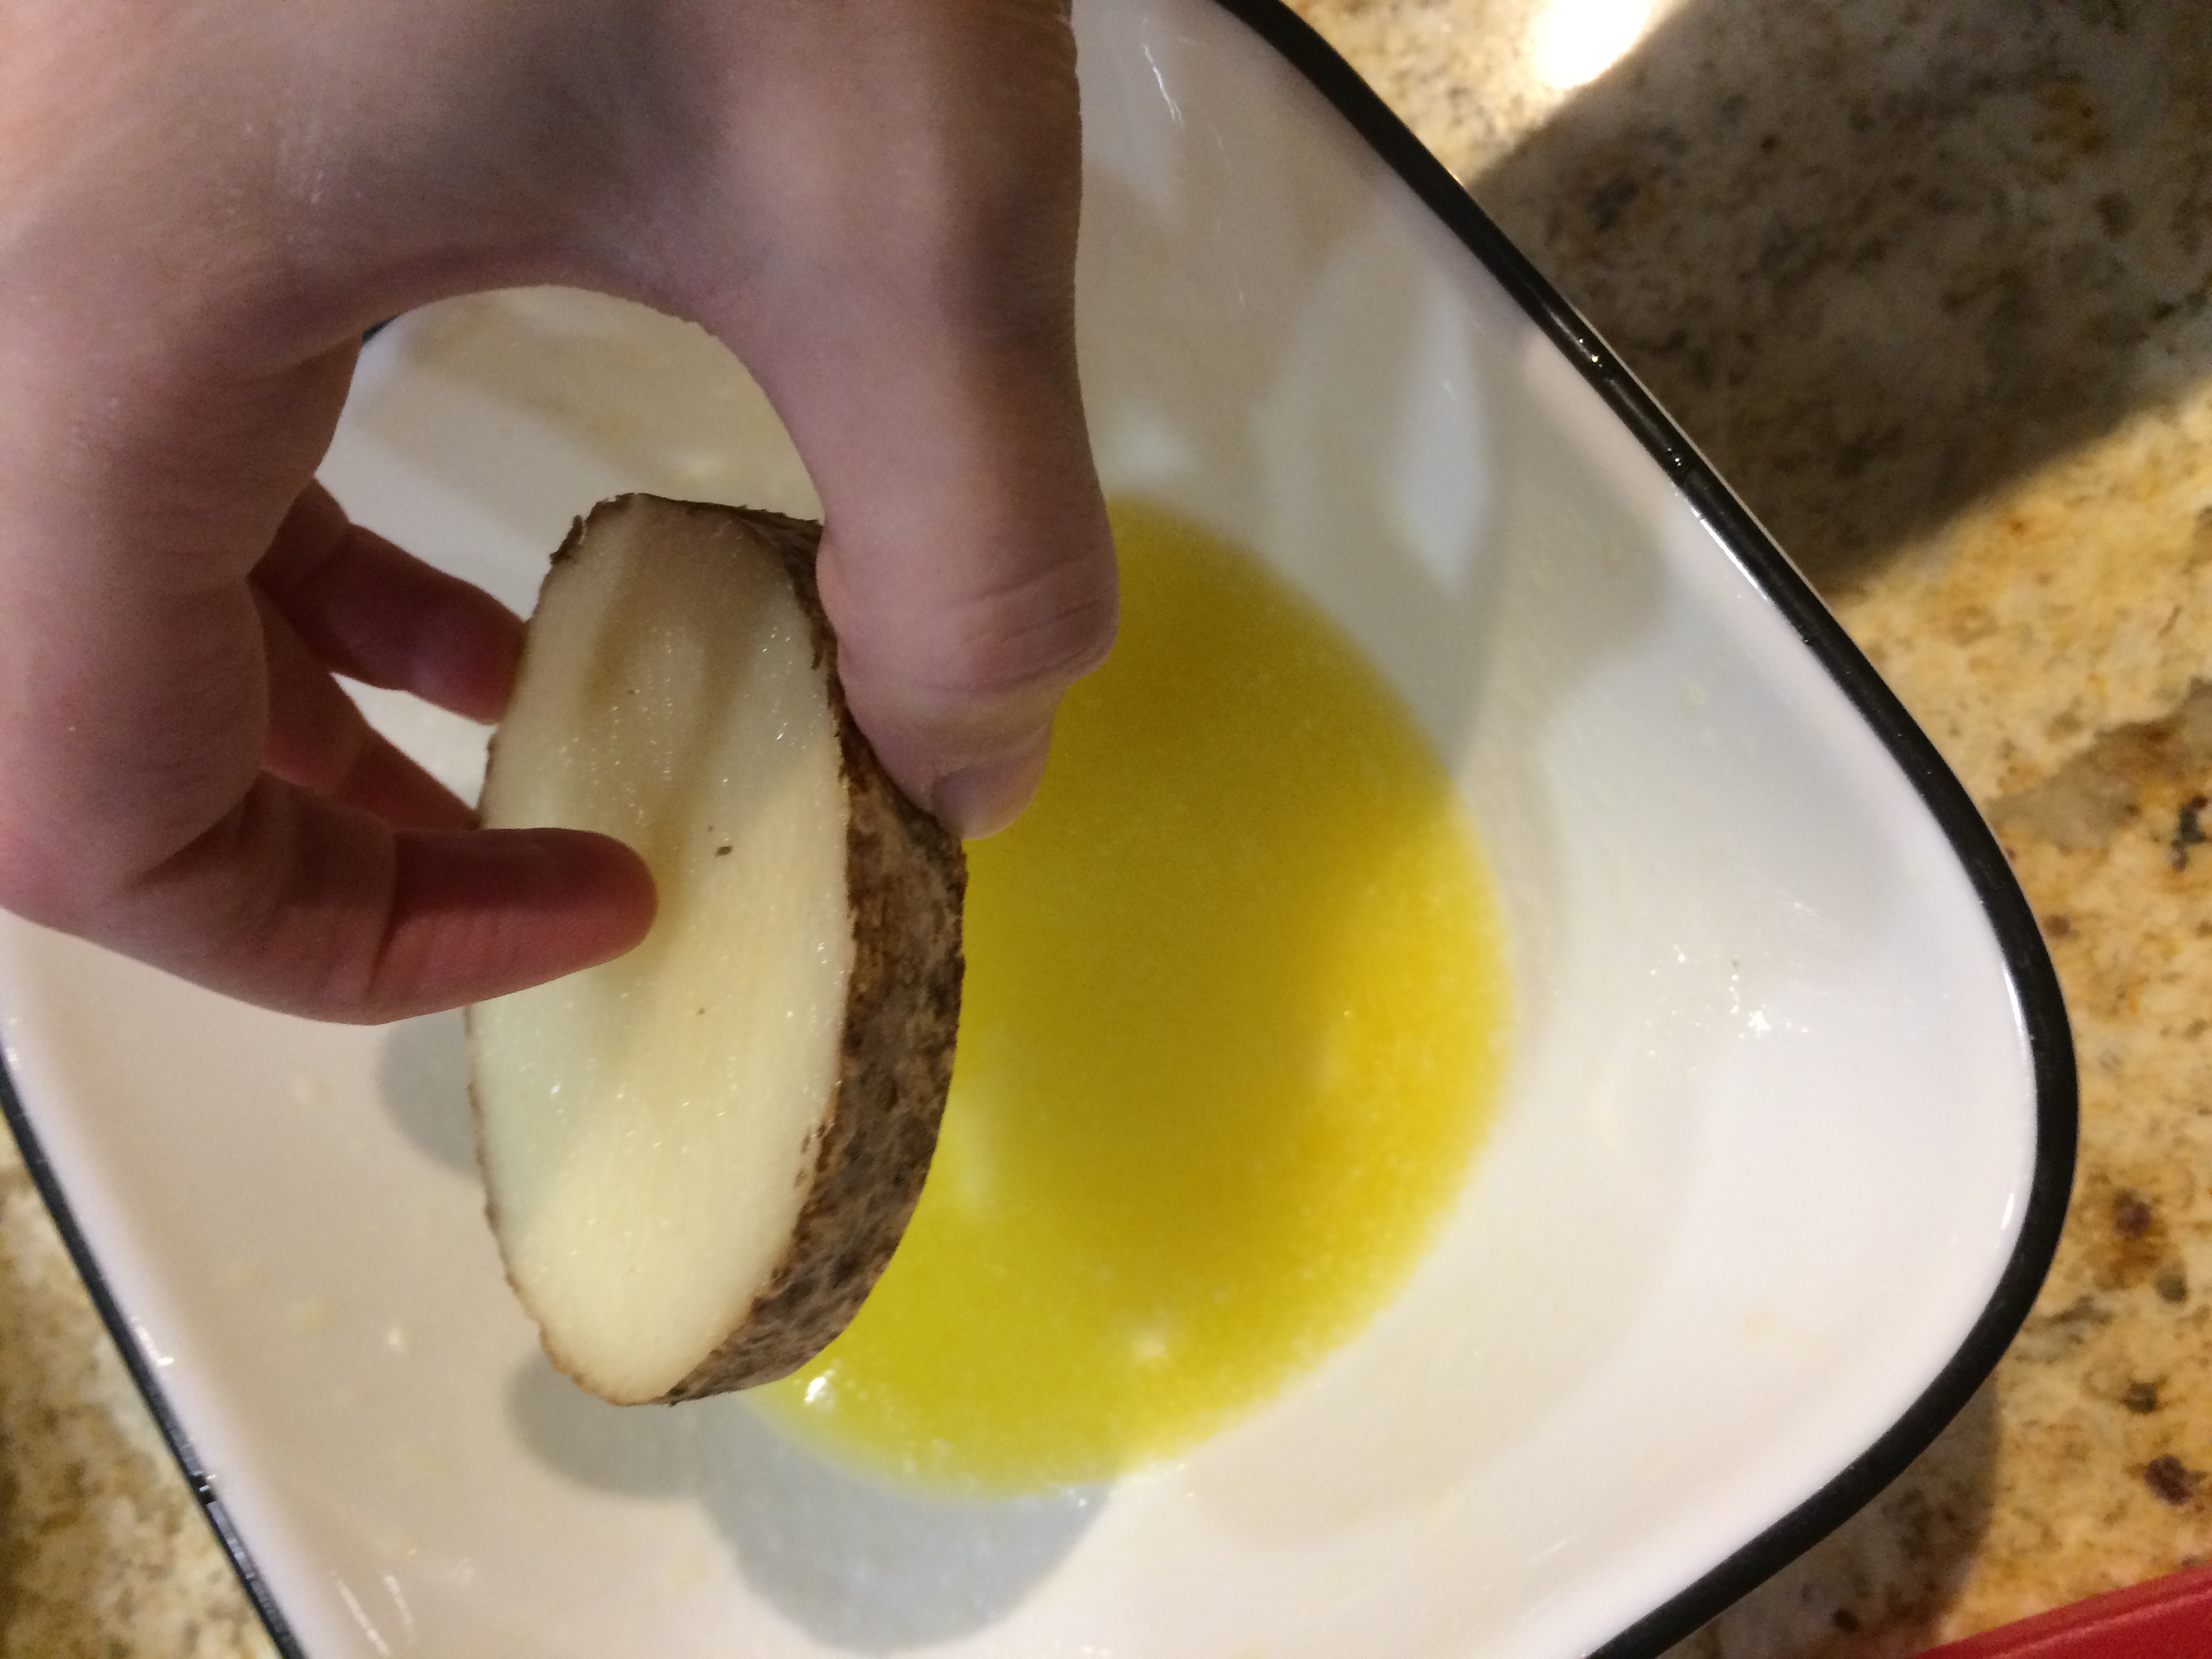
Take your washed potatoes and start slicing them into 1/4 inch rounds.

Take each slice and dunk it into the melted butter.

Place the butter-dunked potato on the cookie sheet.

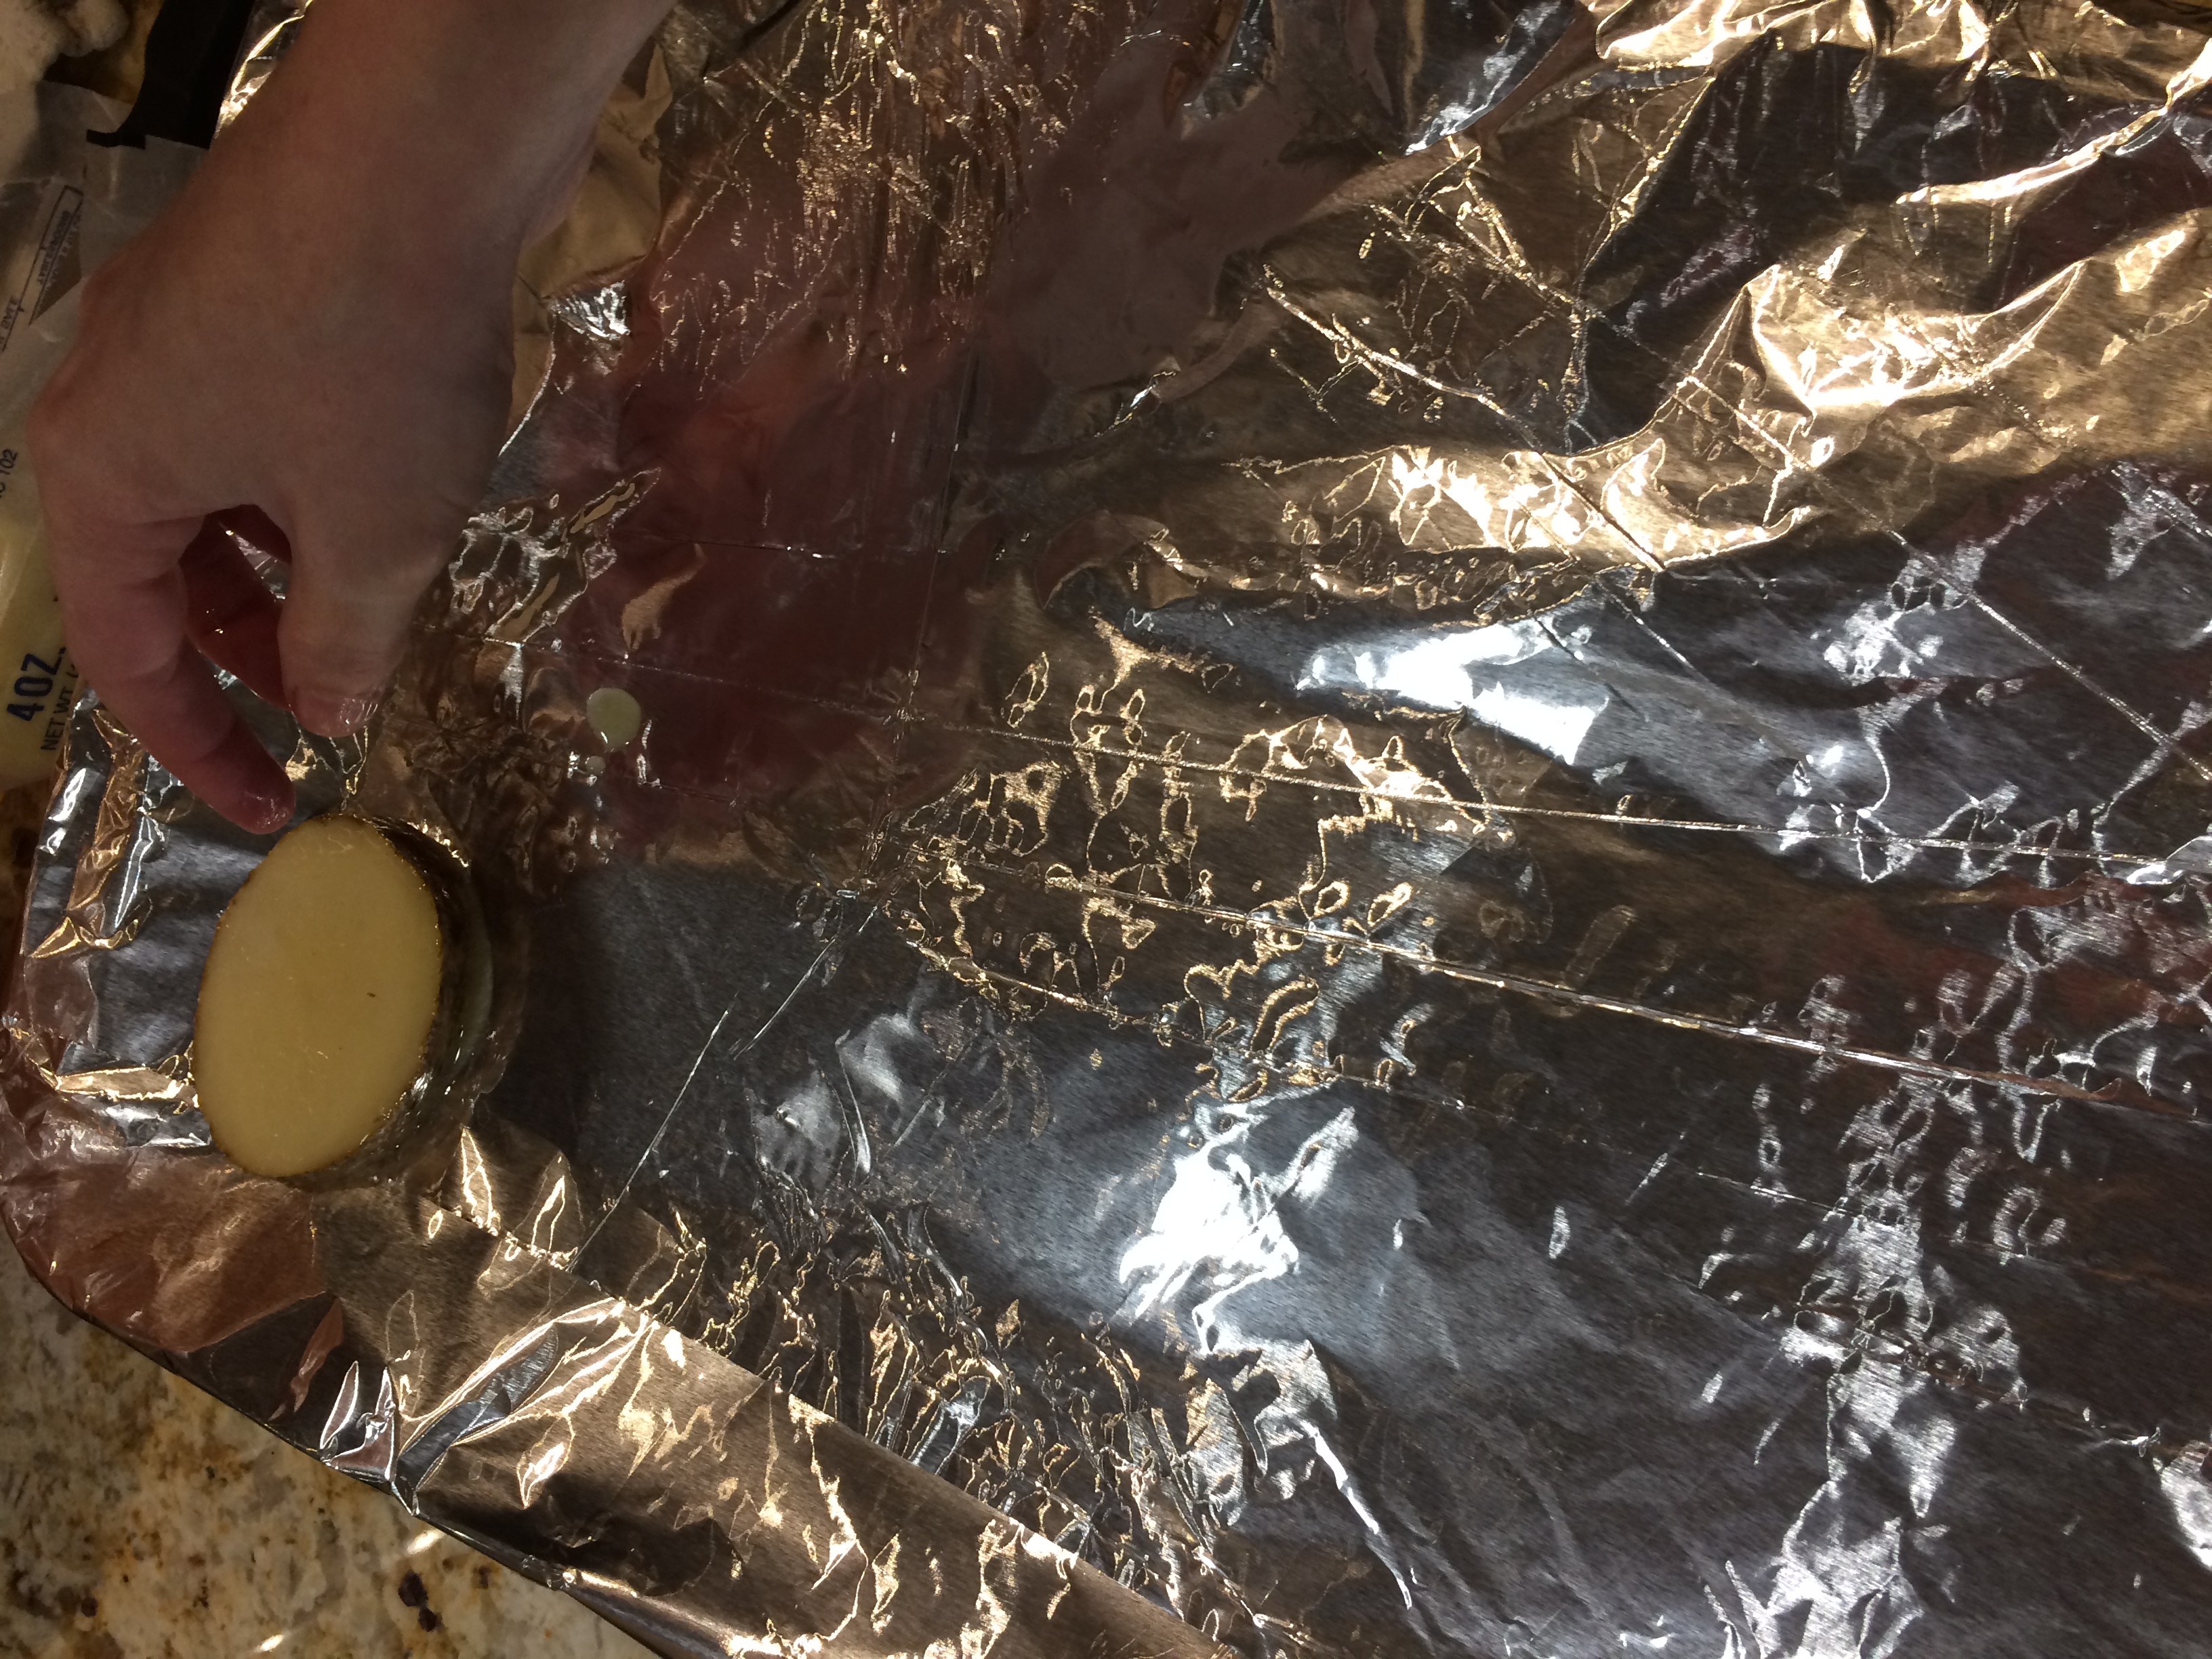
Continue until all the potatoes have been dunked in butter.

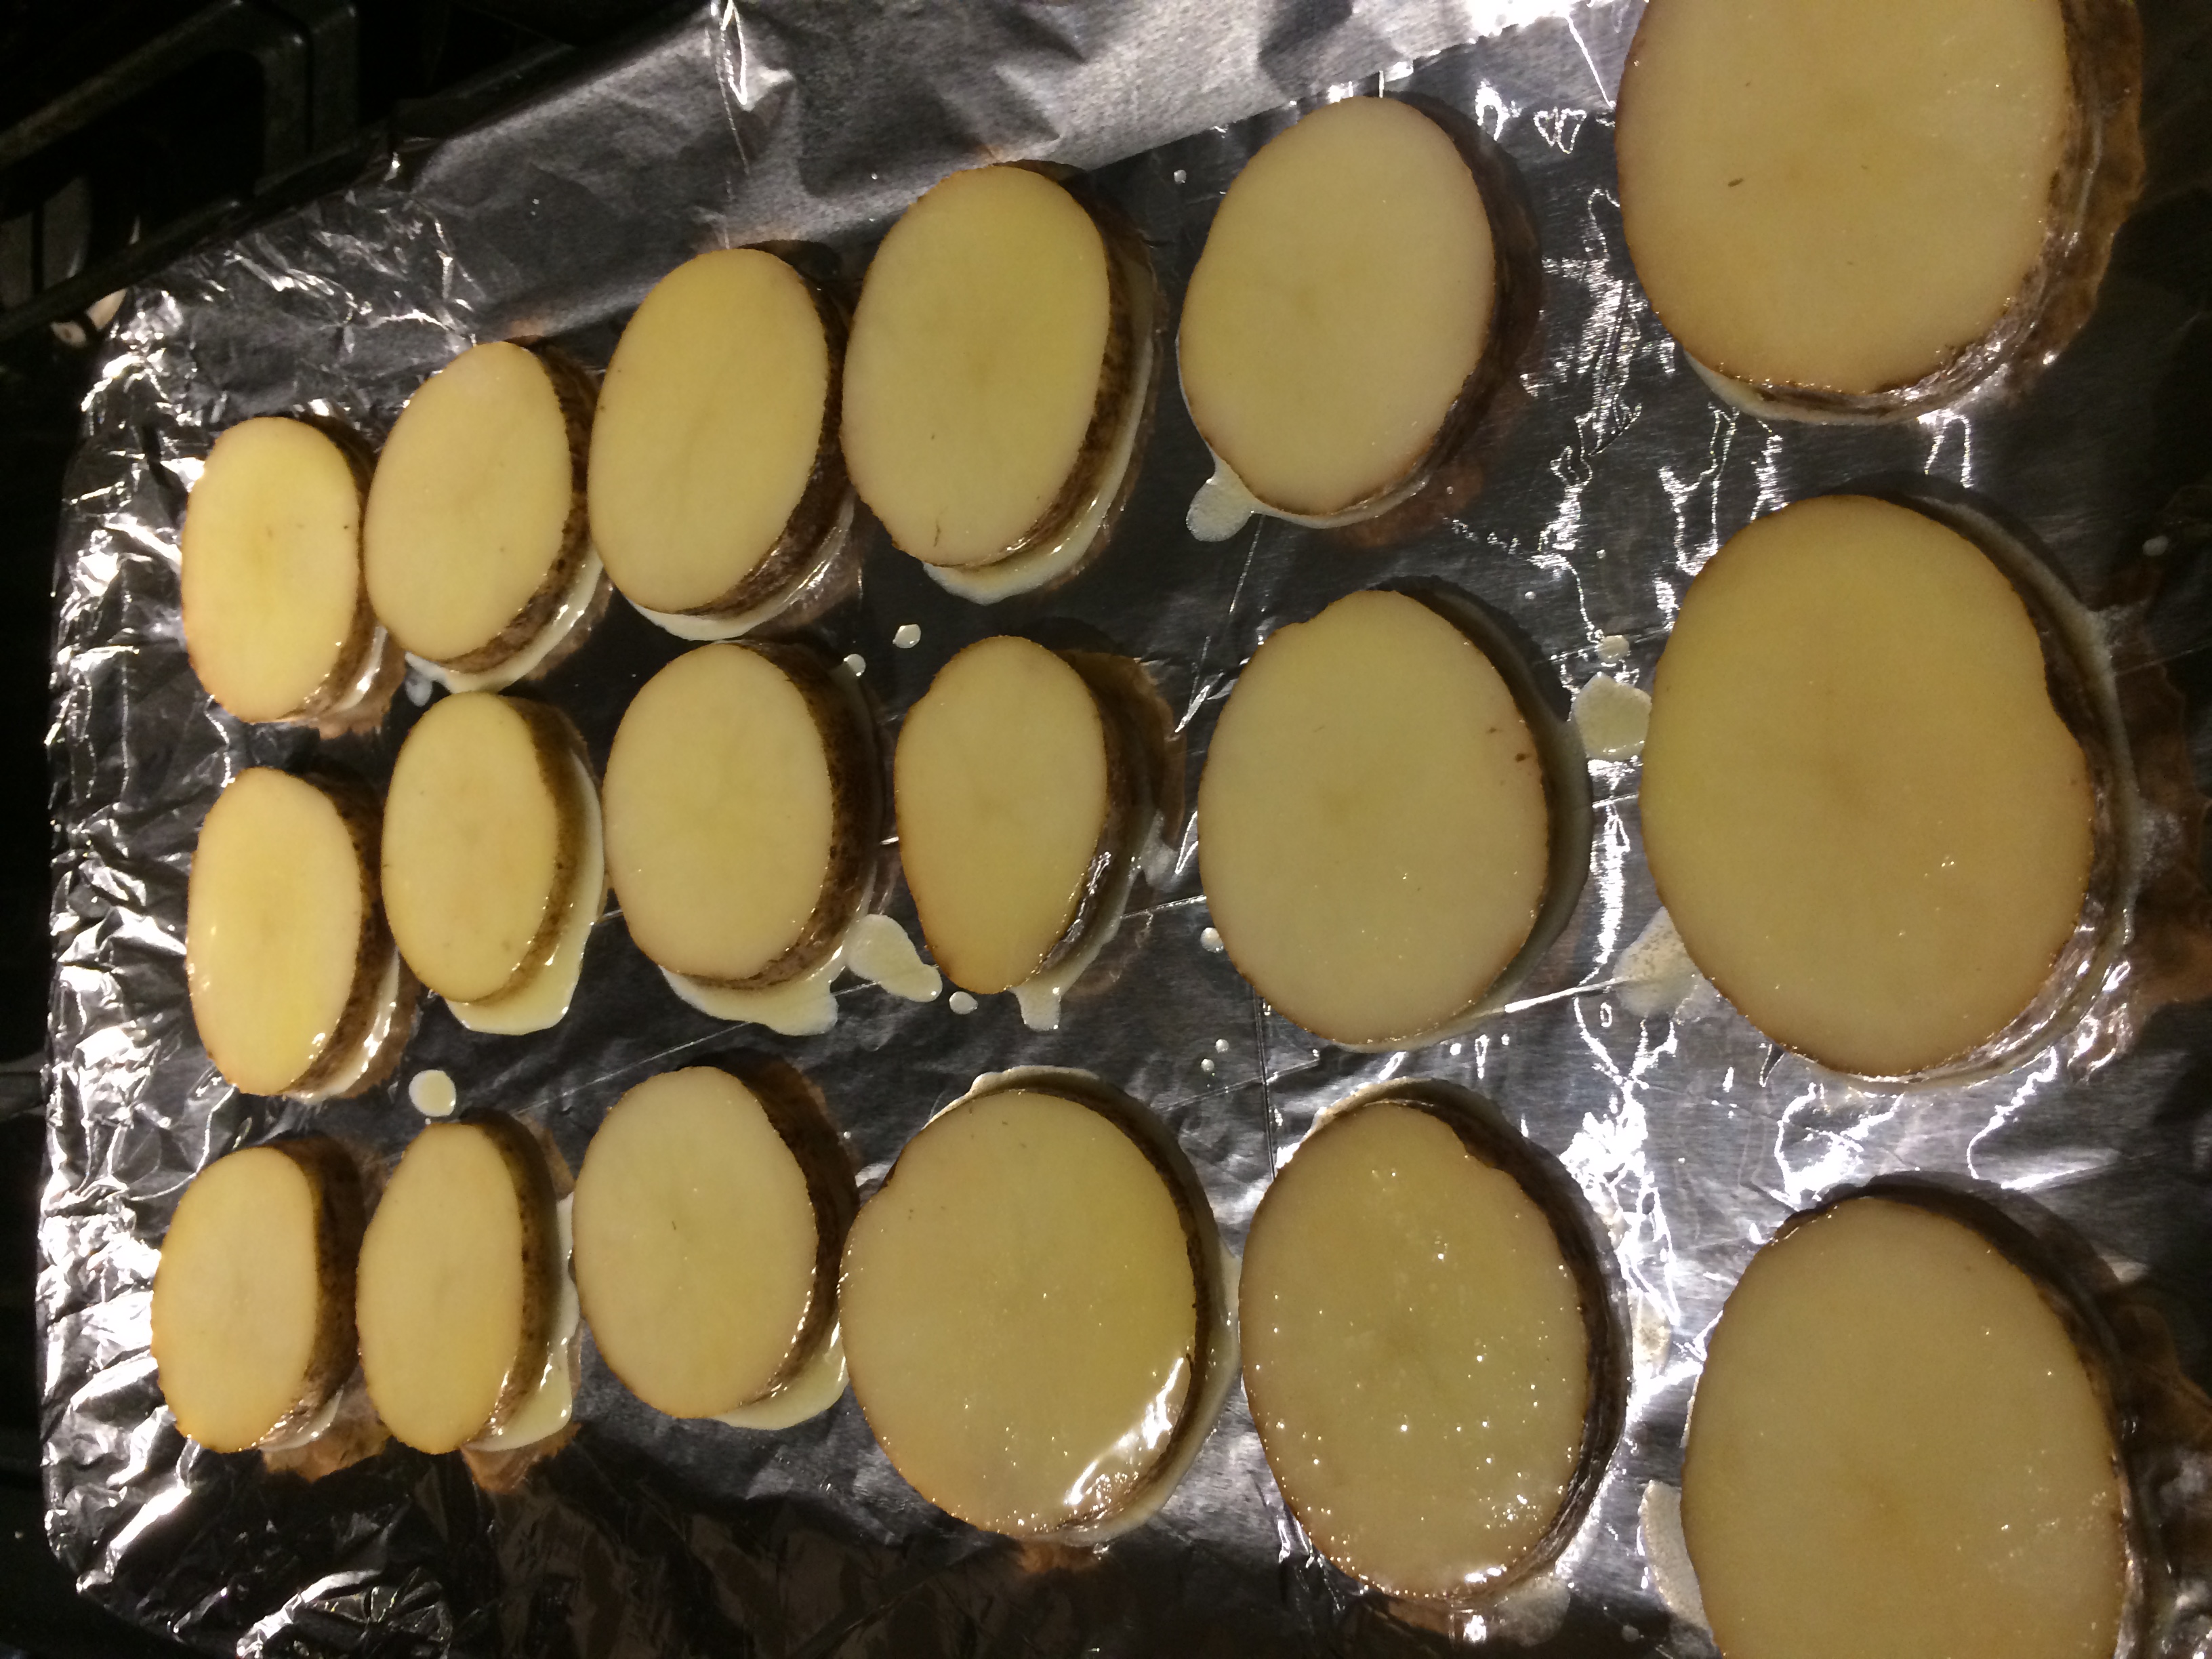
Pop in the 400 degree oven for about 15-20 minutes, flip, then bake for another 15 to 20 minutes.

Remove the golden brown potatoes from the oven and top each slice with cheese, scallions and bacon bits.

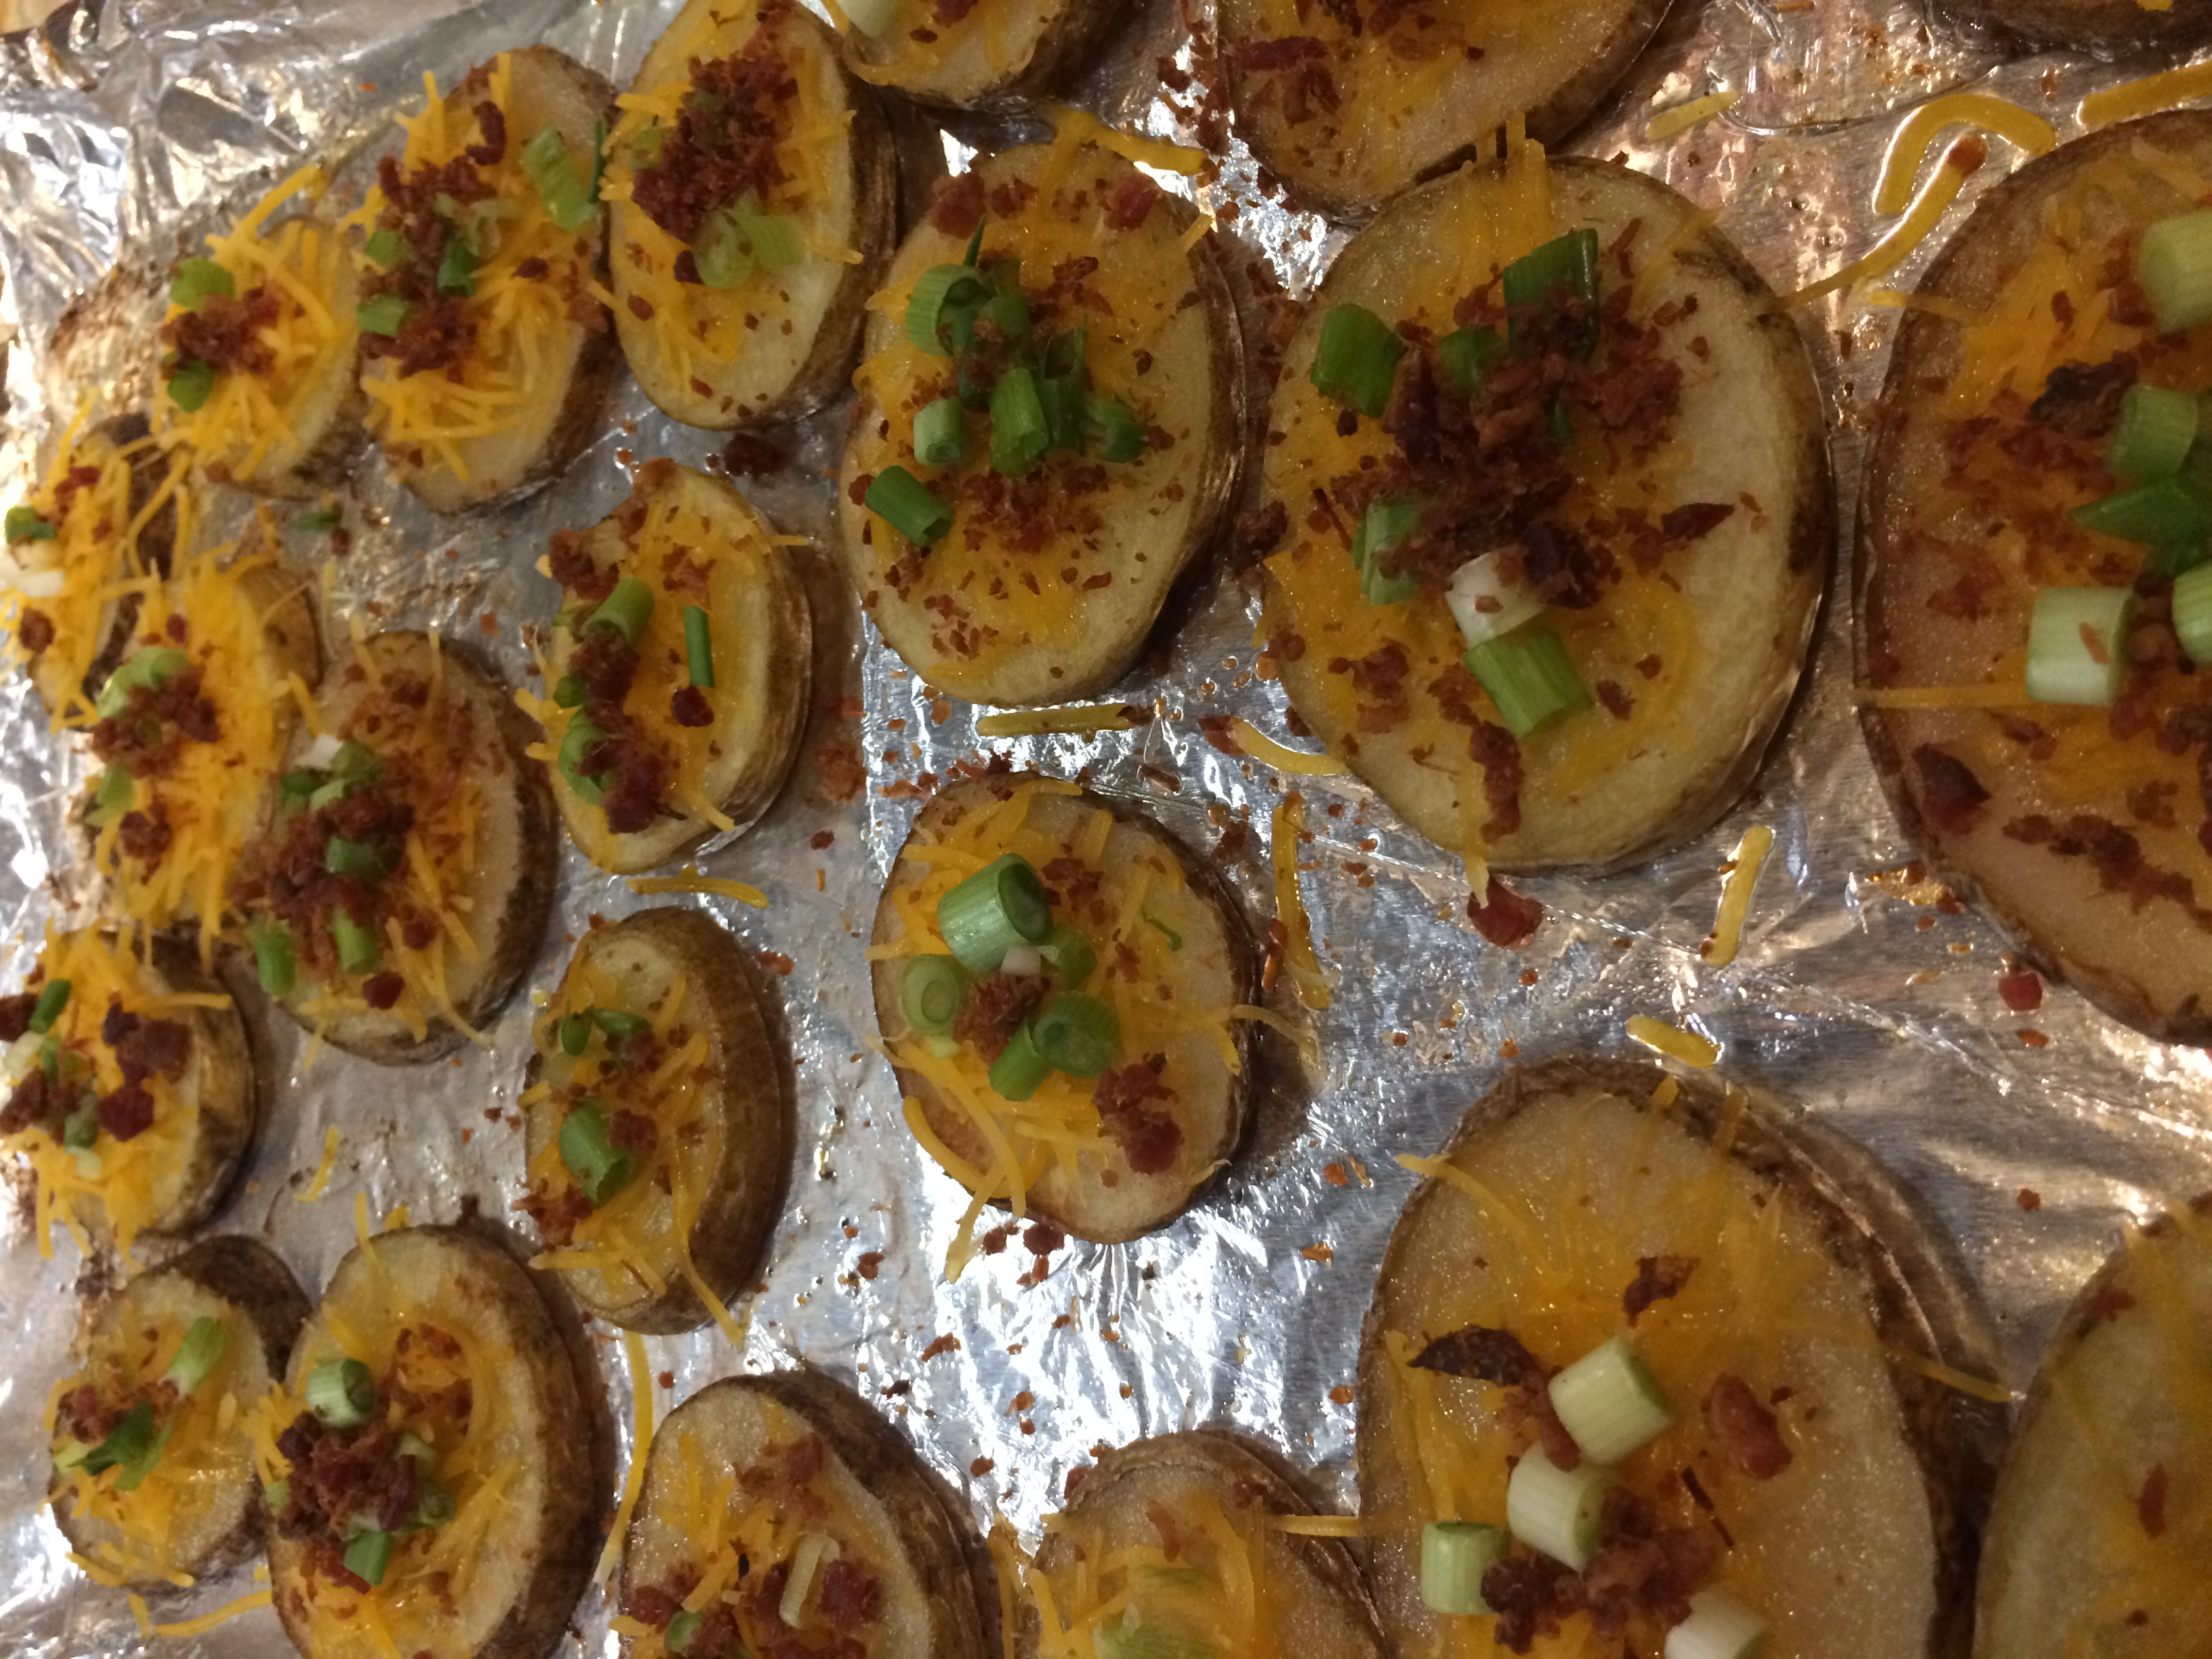
The cheese almost immediately starts melting into the potato.

Place the cookie sheets back in the oven for about 3-4 minutes, just so the cheese melts into the potato.

I made these at a party recently as a test run for game day. Good thing I snagged one when they came out of the oven before putting them out because they were gone almost instantly.


Pulled BBQ Chicken Sandwiches


I so totally left you guys hanging there!

In my last post, I promised you 2 recipes from 1 store bought rotisserie chicken. I gave you the soup and then, poof, I vanished.

Sorry about that, guys!

I promise you it was worth the wait!

I mean, look at that glorious pile of barbecue chicken and side of sweet potato fries!

IMG_3937

This recipe is super easy, and super perfect for a cold, rainy day. So if you’re in the Northeast and getting hit by winter storm Damon, get ready for a cozy dinner to curl up with.

Okay, remember the chicken hubs shredded?

IMG_3926

Well, it is the star of today’s show.

Get the show started by slicing a medium white onion and dropping it into a skillet with a drizzle of olive oil. Cook until softened.

IMG_3931

In the meantime, pour some store bought cole slaw mix (it’s with the salad stuff – a bag of shredded cabbage and carrots) into a bowl and add a splash of apple cider vinegar. Pop in the fridge to chill. The cabbage provides a nice refreshing crispness, and the apple cider vinegar cuts through the fatty richness of the barbecue chicken.

IMG_3930

When the onions are nice and browned, toss in your chicken. A few handfuls, depending on how many sandwiches you’re making.

IMG_3932

Give it a big stir and let the chicken and onions cook together for 5-10 minutes.

Next, add a few tablespoons of your favorite barbecue sauce and stir.

IMG_3933

Let this cook together for another 5 minutes or so.

Then, assemble your sandwich!

Pile high with chicken, coleslaw and some avocado slices.

Add some extra barbecue sauce if you like things saucy ; ).

IMG_3934

Lid on and enjoy!

IMG_3936

Grilled Eggplant Salad

It is way too hot to cook.

Thankfully, there’s some grilled eggplant in the fridge from dinner the other night.

A bed of baby spinach, some grilled eggplant, a drizzle of balsamic and a sprinkle of Parmesan.

Dinner. Done.

IMG_2783

Banh Mi Hot Dog

It’s Memorial Day Weekend! And that means it’s time to slather on the sunscreen and fire up those grills!

Burgers and dogs are the classics for a barbecue, but how about sprucing up the condiment station and giving guests something more than the ketchup, mustard and relish they’ve grown accustomed to?

How about some sriracha yogurt sauce, some cucumbers, cabbage and bean sprouts?

That’s right.

I’m talking about making a banh mi hot dog.

A banh mi is a Vietnamese sandwich made with pork and traditional Vietnamese ingredients like cilantro and pickled carrots.

For our version, we set out a plate with sliced cucumbers, scallions, bean sprouts and shredded cabbage. And mixed up a sauce of Greek yogurt and a few dashes of sriracha.

IMG_2698

So this Memorial Day, turn your plain old hot dog

IMG_2699

Into a spicy, Vietnamese-style banh mi dog

IMG_2700

For additional crunch, we topped ours with some chopped peanuts.

IMG_2701

That Thai iced tea we made yesterday went great with the dogs. Really cools down the srirachi sauce!

Mushroom and Leek Frittata

Frittata is basically the Italian version of quiche.

Only it’s better.

Not because it’s Italian

But because you make the whole thing in one pot.

Score!

Mushrooms and leeks are a fantastic combination. Leeks, if you’ve never had them, have a very mild onion flavor and, because of their light flavor, crispness and pretty green color, they just feel so springy!

Only word of warning, leeks are sandy and gritty. you have to really wash them thoroughly. Preferred method? Slice them in half length-wise, then cut into small slices. Fill a large bowl with water and the drop slices in. The sediment will fall to the bottom.

For this dish you will need

white button mushrooms, sliced

2 leeks, cleaned and sliced

4 eggs

splash of milk

shredded fontina (optional)

olive oil

salt

pepper

Drizzle olive oil in an oven-proof skilled. If you don’t have one, then you’ll just transfer the whole thing to a baking dish and wind up with a two pot dinner instead of a one pot. Still not terrible.

Toss in the mushrooms and cook over medium heat.

IMG_2576

when the mushrooms start to brown, add in the leeks and let them cook for about 10 minutes, until soft.

IMG_2577

season with salt and lots of black pepper and stir.

IMG_2582

Meanwhile, in a bowl whisk together 4 eggs and a splash of milk.

IMG_2584

If you are using, add the grated fontina to the eggs and stir

IMG_2585

Lower the heat on your mushrooms and leeks (or transfer them to a baking dish) and pour the eggs over the veggies.

IMG_2586

If you’re using the frying pan to bake them, bring the heat back up to medium and cook the eggs a bit, maybe 5-7 minutes.

If you’ve transferred to the baking dish, skip this step and instead pop into a 375 degree oven for about 20 minutes.

Either way, cook until the eggs are set. Frying pan method requires less time in the oven as we pre-cooked the eggs a bit.

IMG_2587

Slice up and enjoy.

IMG_2588

Lemon cookies

What a lovely spring day!

And Love is in the air

Today is our  anniversary!  It’s been one heck of a crazy ride – kayaking to the queen’s island, navigating London and Paris, cooking a lot, oh yea, and, of course, saying yes!

I love ya babe and I’m looking forward to all the good things to come.

And if life sends bad things our way, well then, we’ll just take lemons and make lemon cookies!

Because these are seriously amazing.

And!

These are getting into bikini shape friendly cookies. No butter, no milk, no eggs!

Just citrusy lemony goodness.

  • 2 ½ Cups Flour
  • 1 ½ Cups Sugar
  • 2 tsp Baking Soda
  • ¼ tsp salt
  • 2 tbsp Lemon zest
  • ¾ Cup vegetable oil
  • ½ Cup lemon juice (about 3 lemons)
  • 2 tsp Vanilla Extract

Preheat the oven to 350

Mix flour, sugar, baking soda and salt in a bowl.

IMG_2523

Make a well and add lemon juice, vegetable oil and vanilla.

IMG_2524

and mix until combined

IMG_2526

add in the lemon zest and gently mix again

IMG_2525

roll the dough into one inch balls and place on an ungreased cookie sheet.

IMG_2527

bake for about 10 minutes.

The cookies are light and fluffy with a lemony zing.

IMG_2528

I got 33 cookies from this dough. Which seems appropriate as today is our 3 year anniversary.

Indian Spiced Baked Eggs

In keeping with yesterday’s post about expanding our spice palate, today’s dish takes some plain old ingredients on an exotic Indian spice journey.

This recipe comes via the New York Times, though, in my usual fashion, I tweaked it a bit. Also, I started with my oven at 375, but it just was not cooking the eggs. At least not in the 8 to 13 minute time frame they gave. So I upped it to 400. Sorry New York Times, but you may want to double check that.

You will need:

  • 5 yukon potatoes, boiled until tender
  • 1 white onion, sliced thinly
  • 1 can whole peeled tomatoes
  • 4 eggs (2 eggs per person)
  • olive oil
  • 2 cloves of garlic, chopped
  • 1 teaspoon ground coriander
  • 1 teaspoon garam masala
  • salt

Drizzle olive oil into a skillet and toss in the onions and the spices.

IMG_2440

Let these cook over medium until they have softened

IMG_2441

Then add the can of tomatoes and let them cook with the spiced onions

IMG_2442

Meanwhile, slice the potatoes into coins and line a 9×13 baking dish with the slices

IMG_2447

Check on your tomatoes and onions and break them up with the back of a spoon.

IMG_2448

When the mixture is cooked, carefully pour over the potatoes. Pop this into a 400 degree oven for about 15 minutes so the tomatoes and onions bake into the potatoes a bit.

IMG_2449

Remove from the oven and, using a spoon, make four wells in the mixture and carefully crack an egg into each. I suggest cracking into a bowl and the sliding the egg into the well to avoid breaking the yolk.

IMG_2471

Each egg will be surrounded by the warm tomatoes, which will start to cook the eggs. Back into the oven for about 12 minutes, or until the eggs are set.

IMG_2476

The garam masala and coriander take eggs and potatoes from boring and basic to anything but.

Halebi Biber – or Holla Baby Bear

Hooray! We made it to Hump Day!

And to the letter H.

Today I’m not going to share a recipe. Instead I’m going to share a spice with you.

Sometimes you walk into the grocery store and you look around and you see all the vegetables and fruits and you just think, bleh, I’ve cooked with all of this before!

And it’s true. You probably have made so many eggplant dishes, or roasted potatoes or pasta primaveras that you just can’t imagine another one.

Well, instead of trying to find exotic new produce, how about changing up your flavor profile? How about spicing things up a bit?

Haha. See what I did there?

But seriously.

Changing out your basil and oregano for some smoked paprika and garam masala can give the same ‘ol same ‘ol an exotic new kick.

So I want to introduce you to Halebi Biber.

It’s sort of pronounced like holla baby bear, if you said it really quickly, so that’s become the joke in our house. (See my most on Grape Leaves for the origin.)

I had never heard of this spice until I started cooking with my fiance’s grandmother. It’s a spicy red pepper that gets spicier as it cooks. Yes, I learned that the hard way.

IMG_2503

I’m actually going to let my FMIL (future-mother-in-law) tell you about it.

Patty says:

For those who don’t know what “Halebi Biber” is – it’s grounded fresh red pepper that you buy in Armenian/Sirian specialty stores. “Haleb” is really called and spelled Alep or Aleppo and in Arabic they say Haleb. It is a city of northwest Syria near Turkish border inhabited as early as the 6th millennium B.C. Alep was a key point on the caravan route across Syria to Baghdad and later a major center of Christianity in the Middle East. It is now the country’s largest city. I am assuming that [back in the day…] Aleppo “Haleb” must have had the best red pepper for that region so when Armenians use red pepper the name stuck. Halebi (Alep, Seria) and Biber (means pepper)! And there is a little history on where Halebi Biber came from.

So, what can you do with this fun new spice? I keep mine in a a cute little shaker on the counter next to my salt, oil and vinegar. It’s a great addition to a salad dressing.

IMG_2505

It adds a nice little kick to soups and chilis. I’ve even used it to season my ground beef when making tacos.


Dolma – Our first Attempt

We were lucky enough to have learned to make dolma from meme before she passed away.

But the true test?

Making dolma in our own kitchen.

Without meme’s guidance.

It was a cold and gray Sunday, so we decided to roll up our sleeves and give it a try.

Also, I was really adamant about not making it until I had meme’s rock and plate.

(Check out the posts from the day we spent with meme here and here for more on the rock and the plate and for the recipe for dolma.)

When it came time to go through meme’s house and we were talking about who was going to take what, I called the rock and the plate. Not kidding.

Below are some pictures from dolma making our itty bitty kitchen, which, as you can see, spilled over into our living room.

IMG_2377


We didn’t make any grape leaves, since our city apartment doesn’t really allow for a grape vine in the backyard, but we made cabbage, peppers and tomatoes (which are my favorite anyway)

IMG_2378

While the dolma simmered on the stove, the smells that filled the apartment brought us back to meme’s kitchen.

IMG_2380

IMG_2379

And isn’t that why we cook?

Food isn’t just about nutrition and fuel. It’s about memories and about traditions and about keeping people and good times alive.

IMG_2381

Was our dolma perfect?

Nope. (Notes for next time, cook it for longer than meme said to and DO NOT use 90/10 beef. You need the fat of 80/20)

But it was pretty darn close.

And I bet meme was happy to see us in the kitchen.

Homemade Donuts!


So I’ve started having really random cravings for donuts lately.

I say random because I’m really not that big of a fan of donuts.

I’m more that person that walks into a coffee shop, sees a donut that looks tantalizingly delicious, and then takes a bit of it and is woefully disappointed.

I don’t know. Maybe it’s just me, but they always look better than they taste.

So, naturally, I bought a donut pan so I could make my own donuts and control how they taste!

I borrowed this recipe from Sally’s Baking Addiction. I just took out the sprinkles and did away with the glaze to make a super basic cake donut. For round 2 I will probably get creative. But as a base dough, this one rocks.

You will need:

  • 1 cup all-purpose flour
  • 1 teaspoon baking powder
  • 1/4 teaspoon baking soda
  • 1/4 teaspoon ground nutmeg
  • 1/3 cup sugar
  • 1/4 cup milk
  • 1/4 cup Greek yogurt
  • 1 egg
  • 2 tablespoons melted butter
  • 1.5 teaspoons vanilla

Preheat the oven to 350 and grease your donut pan.

In a large bowl whisk together flour, baking powder, baking soda, nutmeg and sugar.

IMG_2301

In another bowl whisk together milk, yogurt, egg, melted butter and vanilla.

IMG_2302

Add the wet to the dry

IMG_2304

and whisk until combined

IMG_2305

Carefully place the batter in the donut pan. I used two tablespoons and carefully scooped the mix. You can also use a pastry bag for better precision (or as Sally did, a ziploc bag that you snip the end off of to make into a pastry bag).

IMG_2306

Bake for 9-10 minutes. I flipped mine over after they were fully baked, since the tops were on the light side, and let them for for a minute to brown them up a bit.

IMG_2307

And voila! Homemade donuts. Little blank canvases waiting for glaze, chocolate ganache, cinnamon sugar, powdered sugar… the possibilities are endless!

IMG_2308